Clean up - the table, room, floorBuild removable section for townBuild permanent roadbed for tramReinforce foam trackbase on various rampsLay cork under track in all visible areas- Lay and fix track except to main section
- Create removable tram track section out of timber (NOW)
- Lay tram track with sensors and sections plus long wiring
- Create tram roadbase - plasticine
- Put tram section in place
- Create removable town section and set aside
- Solder track sections
- Add wiring and sensors to all sections
- Lay sections and run wiring to control system end points
- Remove main section
- Create sectional track pieces and solder
- Add wiring for power
- Remove springs from all points
- Lay track sensors and wire in
- Lay and fix track
- Secure all point servos in place and add main track springs
- Test track with basic motor controller system with points held hard in place
- Rework point control system software and put point control system in place
- Integrate systems and test
- Wire signals
- Add relay control system for lighting
- Place all signals in place, wire lights and test
- Plan village layout and add lighting with wiring
- Integrate track by returning removable control section and connecting up track
- Test by running system with basic software
- Write and test complex control software
- Scenery comes next
Sunday 30 December 2012
Updated to-do list...
Elevated Road Part 2
Just a quick update showing the elevated road's base in place - screwed and glued and the actual raodway ready for cutting out.


Saturday 29 December 2012
Elevated Road - Part 1
So I've made the basic framework for the elevated roadway. I'll have to do some more tomorrow if I can get away with it....so far on these holidays I have also built a dry-stone wall in my front yard, planted a set of seedlings, planned out my new vege garden and I'm going to lay a floating florr in Tom's room - just a few other small proejcts!!
You can see from the photos below a minor variation to the framework I drew up a few posts ago. It's all working our really nicely (fingers crossed - it's Agile carpentry here ;-) ).

You can see the basic support timber above and the profile below.

I've rested the 6mm MDF base here. On top of ths will be the roadbase of 3mm MDF which I will carry all the way through the curve down to the main base board.

The curved road is shown here (below) prototyped in foam-core. It will sit on top of the 6mm MDF as shown.

Just to demonstrate, I've place some track on a 3mm cork base to show how the top of the tracks aligns with the ground level of the village section.

Section for the Town
I've built a removable section on which I can build and detail the village. It's a strip along which I will put the main buildings - just 100mm wide.
The tram way and main road will run in front of this removable section.
You can see from the pictures that it's simply a box section made from 25mm thick polystyrene foam - light but quite rigid. I have mounted a lot of locating plates on the final version (not shown) to ensure it's reliably positioned in the same place.
Hmmm...now I am thinkgin of it, it may be work coating this in a final layer of paper to get it really sharp edged. Let's see.
I've used ordinary PVA to glue this together but also used bamboo skewers to reinforce the structure. Theyve been pushed through at 45 degrees. and you can see a few tell tales here and there.
Note also that I have now completed most of the cork underlay for the track.


Monday 24 December 2012

North Shore Railway Modellers Club Exibition...
The first exhibition of 2013 in Sydney will be the North Shore Railway Modellers Club held on the 2nd and 3rd of March 2013 at the Forrestville Memorial Hall.
Be there or be 'somewhat less daggy than me' !

Be there or be 'somewhat less daggy than me' !

Sunday 23 December 2012
Tram Track Prototype
Well I've been struggling with this for a while and I've finally got an answer...
Use ordinary Peco track and build a road around it. Crazy, you say! Ha!
I've discovered the magic ingredient - plasticine. I've yet to test it but I'm sure this will work out. More on this as I construct it.
In the mean time, I've worked out the gradients and the various issues around curves etc so here's a solution prototyped in easy-to-work foam core.


To Do List
- Clean up - the table, room, floor
- Build removable section for town
- Build permanent roadbed for tram
- Reinforce foam trackbase on various ramps
- Lay cork under track in all visible areas
- Lay and fix track except to main section
- Create removable tram track section out of timber
- Lay tram track with sensors and sections plus long wiring
- Create tram roadbase - plasticine
- Put tram section in place
- Create removable town section and set aside
- Solder track sections
- Add wiring and sensors to all sections
- Lay sections and run wiring to control system end points
- Remove main section
- Create sectional track pieces and solder
- Add wiring for power
- Remove springs from all points
- Lay track sensors and wire in
- Lay and fix track
- Secure all point servos in place and add main track springs
- Test track with basic motor controller system with points held hard in place
- Rework point control system software and put point control system in place
- Integrate systems and test
- Wire signals
- Add relay control system for lighting
- Place all signals in place, wire lights and test
- Plan village layout and add lighting with wiring
- Integrate track by returning removable control section and connecting up track
- Test by running system with basic software
- Write and test complex control software
- Scenery comes next
Tuesday 16 October 2012


Sunday 14 October 2012
Started cutting in ramps and tunnels
I've started cutting in the ramps and tunnels - I decided it was easier to elevate some of the track and cut the track going under into the surface so as to make for a layout that did not have too much height.
This way I can also install the Tram line without having to raise it too high.
Given that the base board is about an inch thick, cutting into it makes a lot of sense.
Pictures tomorrow !
This way I can also install the Tram line without having to raise it too high.
Given that the base board is about an inch thick, cutting into it makes a lot of sense.
Pictures tomorrow !
Sunday 7 October 2012

Garden Computer (distraction!)
On a side
note, my garden computer is making progress - I now have it web
enabled and measuring soil moisture in the front garden. It's been wet
this weekend so the readings are going to be low for a while (meaning
moist). Normally the raw data is scaled between 0 and 1023, 0 being a short circuit (wet) and 1023 being an open circuit (totally dry).
We are expecting more rain tomorrow so it shoudl drop down toward 0 again. Oh well, it needs to be monitored over a month or so, not just a few days.
Have a look at the charts on cosm.
&show_axis_labels=true&detailed_grid=true&scale=manual&min=0&max=100&timezone=Sydney)
We are expecting more rain tomorrow so it shoudl drop down toward 0 again. Oh well, it needs to be monitored over a month or so, not just a few days.
Have a look at the charts on cosm.
Getting back into it!
Now that the weather is warming up again and daylight savings has started it's time to descend to the basement again and work on the model railroad.
I've been struggling with the logistics of the thing on a number of fronts:

.jpg)


I've been struggling with the logistics of the thing on a number of fronts:
- It's too hard to reach the tracks at the back corner of the system and I'm worried about losing stuff there;
- The foam base is fantastic but too hard to attach my servos to for point control;
- I can't easily work on the wiring and program the points without considerable logistical difficulty - it's all too far from teh computer and too hard to mount control systems to;
- I could not find a nice way to build the tram into the system and make the gradients work.

.jpg)
- I reworked the layout so all the rear tracks were much closer to the front and within easy reach. I also came up with a scheme for ensuring trains in tunnes are accessible from the side or below the layout;
- I noted that all the main points are concentrated in a central region of the layout so I've decided to build a timber framed removable central section with a slide out drawer to house the compute. This can then sit on my desk and be built up with tracks, point servos etc, all the points calibrated and a nice neat wiring job to boot;
- The new layout allows for a much longer tram track which can reach the heights I want and use standard peco curves. Much simpler and makes for smoother operation.


Saturday 11 August 2012
N-Scale Lego Train
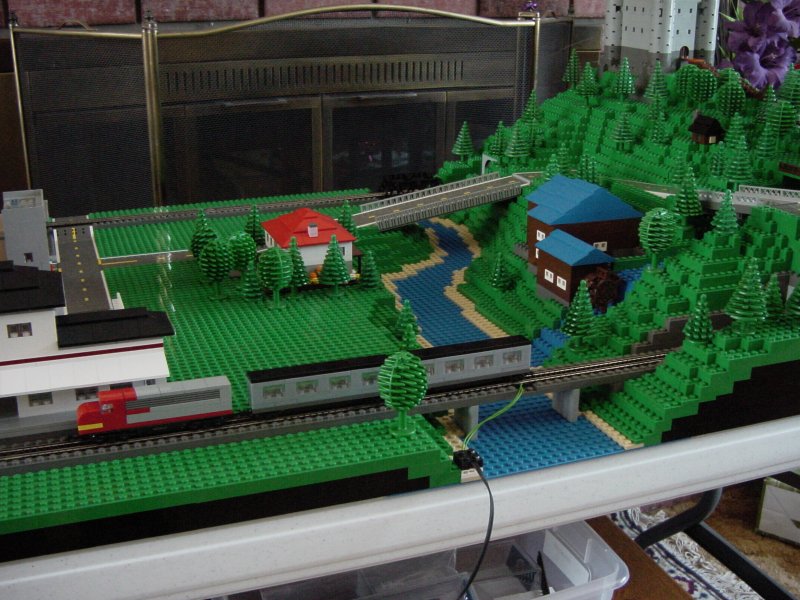
I found this one day on BrickShelf and thought it was totally cool - it's a Lego train set in N-scale. Obviously some hacking of bricks took place to get the engine working. Uses real n-scale track but the houses etc are all Lego.

Beecroft Model Railway Show
Marklin HO layout:


O-scale Narrow Gauge New England layout.
This amazing layout took the build team months of dedicated work based on actual field research in New England. Models were mostly scratch built and the layout is painstakingly put together. The water, in particular, was amazingly realistic. Most models were built from card and balsa.


My new Steam Engine
Just went to the Beecroft show and got a new engine - yeah! Fleishmann n-scale steam engine. It's a beast.
Videos in HD on youtube channel: http://www.youtube.com/themendes
Sunday 10 June 2012
Videos from Epping MR Show
All videos available in HD on my YouTube Channel themendes
http://YouTube.com/themendes
http://YouTube.com/themendes
Photos from the Epping Model Railroad Club Exhibition
We got there by about 9:45 and the queue was half way down the road. This year the focus was on Aussie modelling, even some NSW urban and inter-city models from the 70s. Fantastic. Also of note was Arakoola - a beautifully detailed O-gauge layout.
The second hand stall was chaos. I even had my bag searched on exit.
The next blog post will contain the videos.

 |
| NSW 1970's suburban. Watch video in next blog post... |
 |
| Arakoola O Gauge, Look at the detailing |
 |
| Arakoola - Tracking the engine with my camera. |


Subscribe to:
Posts (Atom)